Through The Attic Planning Guide

This guide will walk you through the steps to plan a Through The Attic chimney pipe installation. We will cover single story homes with flat or vaulted ceilings with an attic.
Note: this guide is for educational purposes only and does not supersede the installation manual or your local building codes. Please consult with a professional chimney installer and your local code enforcement officials for specific installation requirements.
Before you begin print our PDF "How To Measure for Through The Attic Installation" and follow along.
Our Through The Attic Kit includes everything you need to safely pass our Class-A chimney pipe through the ceiling and out the roof.
All you need to add is the Class-A chimney pipe and the single wall stove pipe to complete the kit.
In this guide we will show you how to measure and plan your installation.
The first step to installing any heating appliance, a wood stove for example, is to read the instruction manual for the appliance and pay particular attention to the required clearance to combustibles.
All heating appliances will have requirements that dictate where an appliance can be placed in a room. Things like:
Distance from the back and side wall to the flue when parallel
Distance from the back and side wall to the back of the wood stove when parallel
Distance from the back wall or side wall to the corner of the wood stove when positioned in a corner
Distance from the floor to ceiling (take note if you are installing on a hearth)
There may be special requirements if the stove is to be installed in an alcove
Floor protection is required if the stove is to be placed on a combustible material like carpet, vinyl, wood, etc.


Be sure to check the required clearances to walkways, doors (open and closed), windows, drapes, furniture and anything else in the area.
A common mistake is to forget to "look up". Make sure there are no fixtures or shelves in the way above the appliance.
Single wall stove pipe requires a clearance three times the diameter of the pipe. For example a 6 inch single wall stove pipe requires 18 inches of clearance to combustible materials.
Things like fireplace mantels, ceiling fans, and beams can get in the way. All of this must be considered before you confirm your location for installation.
Once you have an idea of where you want to position your wood stove in the living space it's a good idea to climb in the attic and have a look.
Even though you don't know exactly where your appliance will go just yet you want to make sure there are no obvious issues like an HVAC unit, duct work, plumbing, electrical, or other obstruction that would inhibit your ability to install the chimney in the area you have in mind.
Assuming everything looks good the next step is to climb on the roof and do another preliminary inspection of the area. Just like the attic you want to look for obstructions that would hinder the installation of your chimney like bathroom vents, dormers, other roofs, etc.
If the attic and roof look clear you are set to move onto the planning stage.


Once you have an idea of where you plan to install your heating appliance it's time to mark the spot on the ceiling where the chimney pipe will go.
Place your appliance where you would like it to go and double check your clearances. If you do not have the appliance yet mark out a space on the floor based on the appliance specs. Be sure to mark the center of the flue on the floor as well.
Using a plumb bob or laser find the spot on the ceiling that lines up with the center of the flue collar on the appliance and make a mark.
Drill a small hole in the ceiling at your mark (I like to cut a 12" length off a metal coat hanger and use it as my "drill bit" as it leaves a small hole that is easily patched if needed)
Now climb back in the attic and see where you land between ceiling joists. You will likely need to adjust the location slightly one direction or the other to get centered between ceiling joists.
Though there is no standard a typical residential home will be constructed of 2" x 6" ceiling joists spaced 16" on center.
Our Square Ceiling Support Box for 6" chimney measures 12.2" x 12.2" and 14.3" x 14.3" for 8" chimney. Both support boxes should fit between the rafters with room to spare so your mark does not need to be perfectly centered between the rafters but it does need to be centered enough for the support box to fit.
While you're in the attic take a measurement from the ceiling to the roof and make a note. You will need this measurement later on to determine how much Class-A chimney pipe you need for your installation.
If you identified an obstruction in the attic (like a rafter or the ridge of the roof) you might need to install an Elbow Offset. Take these measurements while you're there as well.

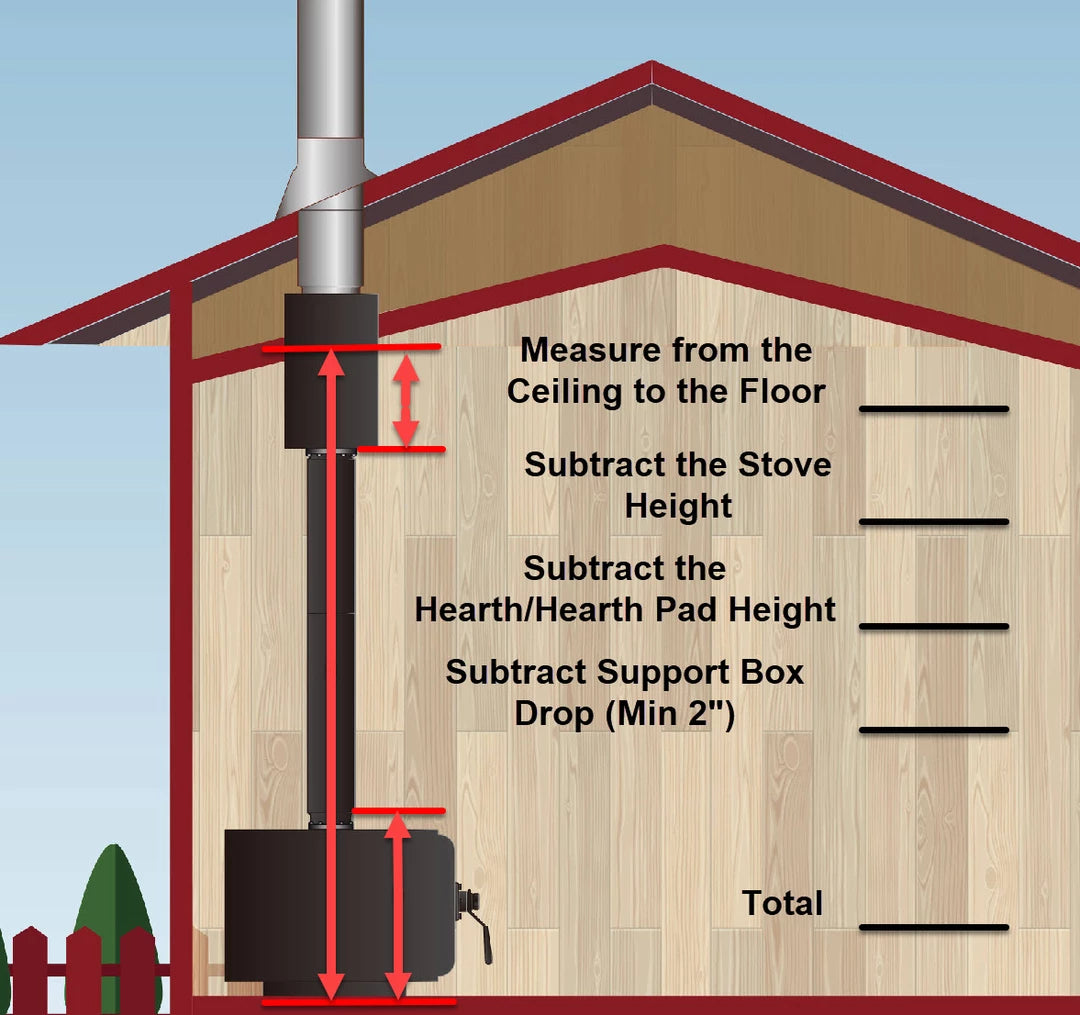
Now that you've confirmed the location of your appliance and triple checked your clearances it's time to determine how much single wall stove pipe you will need for your installation. Take a measurement from the ceiling to the floor.
Now subtract the total height of the stove (measured from the bottom of the stove to the top of the flue collar) from the ceiling height. Don't forget to subtract any hearth or hearth pad that the stove will sit on.
You also need to subtract the distance that the ceiling support box will extend down into the home. The support box must extend a minimum of 2" below the ceiling to meet clearances.
You only need to be close with your measurements here, not exact. Our single wall black stove pipe cannot be cut to size so you will need one of our telescoping lengths to complete your installation. This gives you lots of "play" in your measurement.
Now it's time to get back on the roof and take measurements.
Your chimney must terminate a minimum of 3 feet above the high side where the chimney penetrates the roof and a minimum of 2 feet above any obstacle within a 10 foot diameter of the chimney, including the roof itself.
This is known as the 3 foot, 10 foot, 2 foot rule.
Take a measurement to determine how much chimney pipe you will need above the roof. When in doubt it is always a good idea to make your chimney longer as a longer chimney will provide a better draft.


You will also need to know the pitch of your roof to purchase the correct roof flashing. If you do not know the pitch of your roof you can easily measure it. All you need is a tape measure and a level that is at least 12" long.
Measure 12" on your level and make a mark
Hold the level against the roof so the mark is on the bottom of the level
Measure from the roof up to the mark on the bottom of the level (while holding the level... level)
This measurement is known as the "rise". If, for example, the measurement is 8" then your roof rises 8" for every 12" of "run". This is known as a 8/12 pitch roof.
If your roof is extremely steep and getting on the roof to measure it is not an option you can do the exact same thing in reveres on the inside of the house against the ceiling since both the ceiling and the roof are the same pitch in a cathedral ceiling.
Right this down so you know what roof flashing to select when purchasing your kit.
This completes our Through The Attic Planning Guide. If you have any questions at all please don't hesitate to give us a call, send us an email, or click on the chat bottom at the bottom of your screen to chat with us live.
We're here to help!
Helpful Links:
Through The Attic Kit
Elbow Offset Kit
Extended Roof Brace
